生活不易、且行且珍惜。网站首页 程序人生
从零开始做网站4-创建vue项目,整合后台系统
发布时间:2022-05-18 21:44编辑:zj 阅读: 文章分类:
网站互动QQ群:170915747
后端项目搭建出底子了,数据持久化也做了,然后就是前端开发了,首先呢是要创建一个vue项目,然后先做后台管理系统再高前台博客。。
Vue (读音 /vjuː/,类似于 view) 是一套用于构建用户界面的渐进式框架。与其它大型框架不同的是,Vue 被设计为可以自底向上逐层应用。Vue 的核心库只关注视图层,不仅易于上手,还便于与第三方库或既有项目整合。另一方面,当与现代化的工具链以及各种支持类库结合使用时,Vue 也完全能够为复杂的单页应用提供驱动。
node.js安装参考:https://www.zjhuiwan.cn/info/20220408/4408162514227884.html
vue环境搭建参考:https://www.zjhuiwan.cn/info/20190307/1903071058073480002.html
之前记得笔记还是有用的,不然指定网上遍地找呢,已经忘记怎么搭建vue的脚手架了,毕竟我是个后端开发呀哈哈。
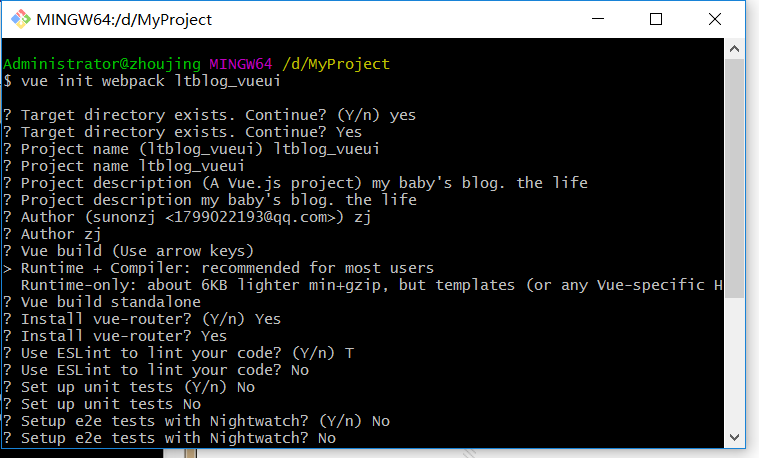
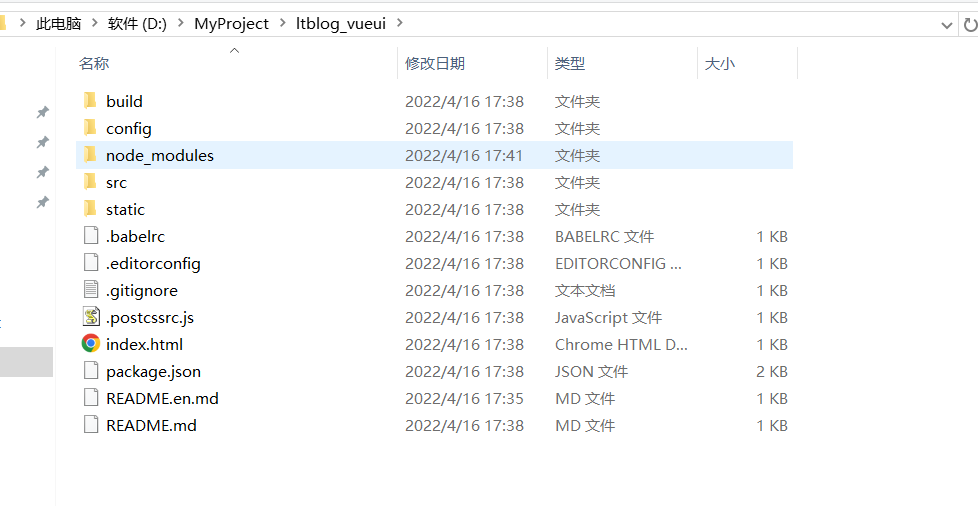
跟着之前写的执行命令,创建好项目


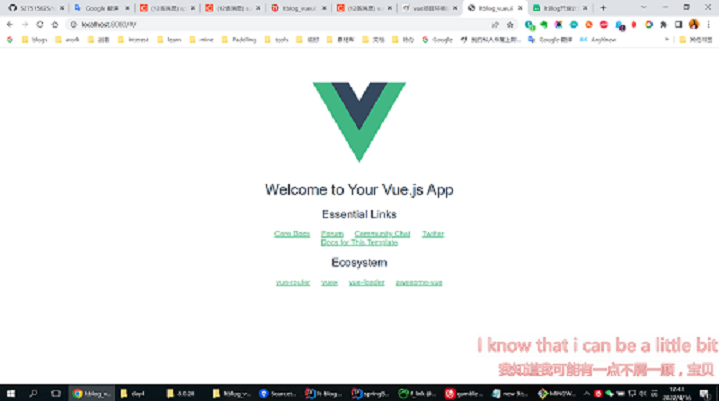
然后运行

访问试一下,ok了

然后就是找个vue版本的后台管理系统模板了,今天就是做一个简单的列表功能
找了个vue3.0的后台管理系统,真的是有好多不会的啊
不过慢慢来吧,学起来~
然后就是开始根据自己的实际系统需求开造,首先测试一下前后端能否联通
先试一试列表页
<template>
    <div>
        <div class="crumbs">
            <el-breadcrumb separator="/">
                <el-breadcrumb-item>
                    <i class="el-icon-lx-cascades"></i> 文章列表
                </el-breadcrumb-item>
            </el-breadcrumb>
        </div>
        <div class="container">
            <div class="handle-box">
                <el-select v-model="query.address" placeholder="地址" class="handle-select mr10">
                    <el-option key="1" label="广东省" value="广东省"></el-option>
                    <el-option key="2" label="湖南省" value="湖南省"></el-option>
                </el-select>
                <el-input v-model="query.name" placeholder="用户名" class="handle-input mr10"></el-input>
                <el-button type="primary" icon="el-icon-search" @click="handleSearch">搜索</el-button>
            </div>
            <el-table :data="tableData" border class="table" ref="multipleTable" header-cell-class-name="table-header">
                <el-table-column prop="id" label="序号" width="55" align="center"></el-table-column>
                <el-table-column prop="name" label="标题"></el-table-column>
                <el-table-column prop="type" label="类别"> </el-table-column>
                <el-table-column label="封面图(查看大图)" align="center">
                    <template #default="scope">
                        <el-image class="table-td-thumb" :src="scope.row.articleImg" :preview-src-list="[scope.row.articleImg]">
                        </el-image>
                    </template>
                </el-table-column>
                <el-table-column prop="summary" label="摘要"></el-table-column>
              <el-table-column prop="accessNum" label="阅读数"></el-table-column>
              <el-table-column prop="thumbsNum" label="点赞数"></el-table-column>
                <el-table-column label="状态" align="center">
                    <template #default="scope">
                        <el-tag :type="
                                scope.row.status === '0'
                                    ? 'success'
                                    : scope.row.status === '1'
                                    ? 'danger'
                                    : ''
                            ">{{ scope.row.status }}</el-tag>
                    </template>
                </el-table-column>

                <el-table-column prop="createDate" label="创建时间"></el-table-column>
                <el-table-column label="操作" width="180" align="center">
                    <template #default="scope">
                        <el-button type="text" icon="el-icon-edit" @click="handleEdit(scope.$index, scope.row)">编辑
                        </el-button>
                        <el-button type="text" icon="el-icon-delete" class="red"
                            @click="handleDelete(scope.$index, scope.row)">删除</el-button>
                    </template>
                </el-table-column>
            </el-table>
            <div class="pagination">
                <el-pagination background layout="total, prev, pager, next" :current-page="query.pageIndex"
                    :page-size="query.pageSize" :total="pageTotal" @current-change="handlePageChange"></el-pagination>
            </div>
        </div>


    </div>
</template>

<script>
import { ref, reactive } from "vue";
import { ElMessage, ElMessageBox } from "element-plus";
import { fetchData } from "../api/index";

export default {
    name: "basetable",
    setup() {
        const query = reactive({
            address: "",
            name: "",
            pageIndex: 1,
            pageSize: 10,
        });
        const tableData = ref([]);
        const pageTotal = ref(0);
        // 获取表格数据
        const getData = () => {
            fetchData(query).then((res) => {
              console.log(res)
                tableData.value = res;
                pageTotal.value = res.pageTotal || 50;
            });
        };
        getData();

        return {
            query,
            tableData,
            pageTotal,
            editVisible,
            form,
            handleSearch,
            handlePageChange,
            handleDelete,
            handleEdit,
            saveEdit,
        };
    },
};
</script>
1、setup函数是处于 生命周期函数 beforeCreate 和 Created 两个钩子函数之间的函数 也就说在 setup函数中是无法 使用 data 和 methods 中的数据和方法的
2、setup函数是 Composition API(组合API)的入口
3、在setup函数中定义的变量和方法最后都是需要 return 出去的 不然无法再模板中使用
结合ref使用
<template>
 <div id="app">
  {{name}}
  <p>{{age}}</p>
  <button @click="plusOne()">+</button>
 </div>
</template>

<script>
import {ref} from 'vue'
export default {
 name:'app',
 data(){
  return {
   name:'xiaosan'
  }
 },
 setup(){
  const name =ref('小四')
  const age=ref(18)
  function plusOne(){
   age.value++ //想改变值或获取值 必须.value
  }
  return { //必须返回 模板中才能使用
   name,age,plusOne
  }
 }
}
</script>
ref
接受一个内部值并返回一个响应式且可变的 ref 对象。ref 对象具有指向内部值的单个 property。
ref推荐对基础数据类型进行处理,引用的数据类型虽然也能形成响应式,但性能不够好。
基础数据类型
import { ref } from 'vue'
export default {
	setup() {
    	 const count = ref(0)
    	 const onClickAddCount = () => {
         	count.value += 1
         }
        return { count, onClickAddCount }
    }
}
引用数据类型
import { ref } from 'vue'
export default {
	setup() {
    	const obj = ref({
       		a: 0
    	})

    const onClickAddObj = () => {
      obj.value = {
        a: obj.value.a + 1
      }
    }
        return { obj , onClickAddObj }
    }
}
reactive
reactive 是 Vue3 中提供的实现响应式数据的方法。
在 Vue2 中响应式数据是通过 defineProperty 来实现的,在 Vue3 中响应式数据是通过 ES6 的 Proxy来实现的。
reactive 参数必须是对象 (json / arr)
如果给 reactive 传递了其它对象
默认情况下,修改对象无法实现界面的数据绑定更新。
如果需要更新,需要进行重新赋值。(即不允许直接操作数据,需要放个新的数据来替代原数据)
<template>
<div>
  <p>{{msg}}</p>
  <button @click="c">button</button>
</div>
</template>

<script>
import { reactive } from 'vue'
export default {
  name: 'App',
  setup() {
    let msg = reactive([1, 2, 3])
    function c() {
      console.log(msg);
      msg[0] += 1;
      msg[1] = 5;
    }
    return {
      msg,
      c
    };
  }
}
</script>
跨域问题

跨域是个老问题了,之前工作中就遇到不少次,前端后端都可以解决,为了方便,直接在后端解决下。
在Springboot启动类里加上如下代码,重启之后即可实现跨域访问,前端无需再配置跨域。
@SpringBootApplication
//添加扫描mybatis的dao层接口,生成实现类
@MapperScan(value = "com.zjlovelt.mapper")
public class LtBlogApplication extends WebMvcConfigurerAdapter {

    public static void main(String[] args) {
        SpringApplication.run(LtBlogApplication.class, args);
    }

    @Override
    public void addCorsMappings(CorsRegistry registry) {

        registry.addMapping("/**")
                .allowedOriginPatterns("*")
                .allowedMethods("GET", "HEAD", "POST", "PUT", "DELETE", "OPTIONS")
                .allowCredentials(true)
                .maxAge(3600)
                .allowedHeaders("*");
    }
}
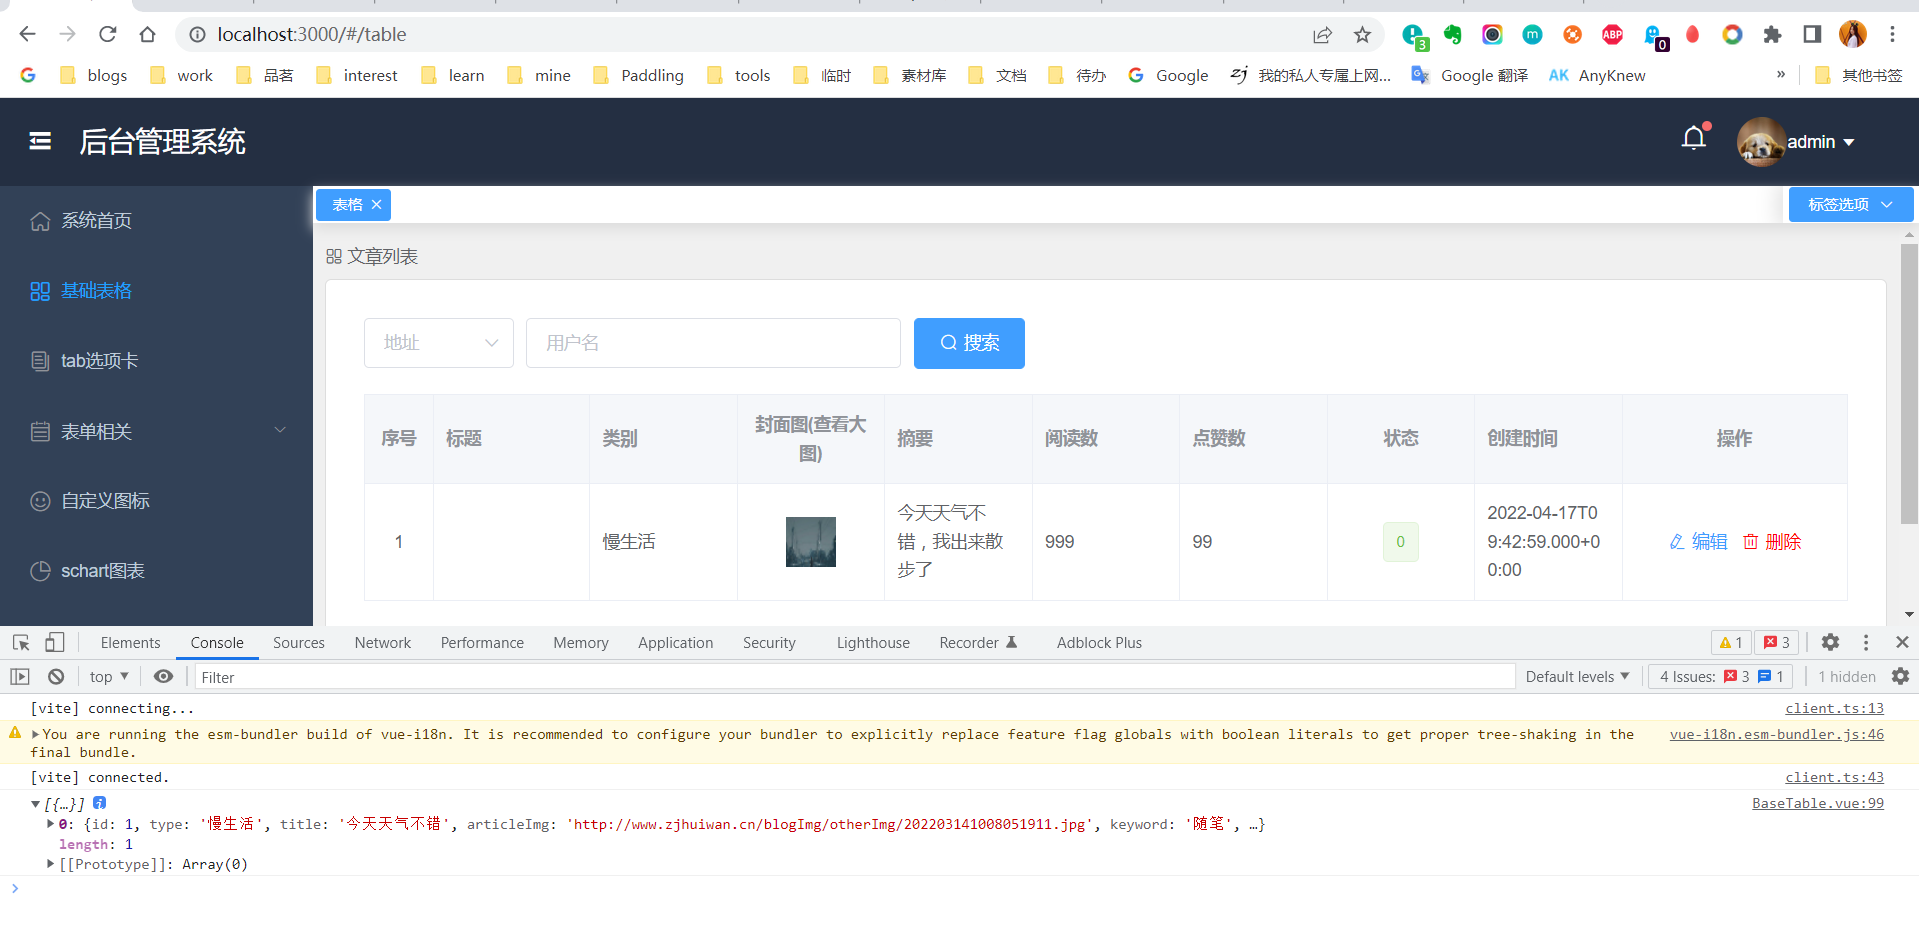
然后去列表刷新,完美。

一个简单的列表查询就好了,这也代表前后端通了
后面就就是先做后台管理系统了,根据自己博客的需求来做,文章管理、照片管理、心情管理、友链管理、留言管理等等等功能的后台开发。
#去评论一下
标签:#Springboot#Vue
版权声明:本博客的所有原创内容皆为作品作者所有
转载请注明:来自ZJBLOG 链接:www.zjhuiwan.cn

 +1
+1
「万物皆有时,比如你我相遇」
感谢大佬打赏【请选择支付宝或微信,再选择金额】
使用微信扫描二维码完成支付


![[冒泡专用表情]](https://www.zjhuiwan.cn/images/images/zjemogi.png)
![[呵呵]](https://www.zjhuiwan.cn/images/images/smilea_thumb.gif)
![[嘻嘻]](https://www.zjhuiwan.cn/images/images/tootha_thumb.gif)
![[哈哈]](https://www.zjhuiwan.cn/images/images/laugh.gif)
![[可爱]](https://www.zjhuiwan.cn/images/images/tza_thumb.gif)
![[可怜]](https://www.zjhuiwan.cn/images/images/kl_thumb.gif)
![[挖鼻屎]](https://www.zjhuiwan.cn/images/images/kbsa_thumb.gif)
![[吃惊]](https://www.zjhuiwan.cn/images/images/cj_thumb.gif)
![[害羞]](https://www.zjhuiwan.cn/images/images/shamea_thumb.gif)
![[挤眼]](https://www.zjhuiwan.cn/images/images/zy_thumb.gif)
![[闭嘴]](https://www.zjhuiwan.cn/images/images/bz_thumb.gif)
![[鄙视]](https://www.zjhuiwan.cn/images/images/bs2_thumb.gif)
![[爱你]](https://www.zjhuiwan.cn/images/images/lovea_thumb.gif)
![[泪]](https://www.zjhuiwan.cn/images/images/sada_thumb.gif)
![[偷笑]](https://www.zjhuiwan.cn/images/images/heia_thumb.gif)
![[亲亲]](https://www.zjhuiwan.cn/images/images/qq_thumb.gif)
![[生病]](https://www.zjhuiwan.cn/images/images/sb_thumb.gif)
![[太开心]](https://www.zjhuiwan.cn/images/images/mb_thumb.gif)
![[懒得理你]](https://www.zjhuiwan.cn/images/images/ldln_thumb.gif)
![[右哼哼]](https://www.zjhuiwan.cn/images/images/yhh_thumb.gif)
![[左哼哼]](https://www.zjhuiwan.cn/images/images/zhh_thumb.gif)
![[嘘]](https://www.zjhuiwan.cn/images/images/x_thumb.gif)
![[衰]](https://www.zjhuiwan.cn/images/images/cry.gif)
![[委屈]](https://www.zjhuiwan.cn/images/images/wq_thumb.gif)
![[吐]](https://www.zjhuiwan.cn/images/images/t_thumb.gif)
![[打哈气]](https://www.zjhuiwan.cn/images/images/k_thumb.gif)
![[怒]](https://www.zjhuiwan.cn/images/images/angrya_thumb.gif)
![[疑问]](https://www.zjhuiwan.cn/images/images/yw_thumb.gif)
![[馋嘴]](https://www.zjhuiwan.cn/images/images/cza_thumb.gif)
![[拜拜]](https://www.zjhuiwan.cn/images/images/88_thumb.gif)
![[思考]](https://www.zjhuiwan.cn/images/images/sk_thumb.gif)
![[汗]](https://www.zjhuiwan.cn/images/images/sweata_thumb.gif)
![[困]](https://www.zjhuiwan.cn/images/images/sleepya_thumb.gif)
![[睡觉]](https://www.zjhuiwan.cn/images/images/sleepa_thumb.gif)
![[钱]](https://www.zjhuiwan.cn/images/images/money_thumb.gif)
![[失望]](https://www.zjhuiwan.cn/images/images/sw_thumb.gif)
![[酷]](https://www.zjhuiwan.cn/images/images/cool_thumb.gif)
![[花心]](https://www.zjhuiwan.cn/images/images/hsa_thumb.gif)
![[哼]](https://www.zjhuiwan.cn/images/images/hatea_thumb.gif)
![[鼓掌]](https://www.zjhuiwan.cn/images/images/gza_thumb.gif)
![[晕]](https://www.zjhuiwan.cn/images/images/dizzya_thumb.gif)
![[悲伤]](https://www.zjhuiwan.cn/images/images/bs_thumb.gif)
![[抓狂]](https://www.zjhuiwan.cn/images/images/crazya_thumb.gif)
![[黑线]](https://www.zjhuiwan.cn/images/images/h_thumb.gif)
![[阴险]](https://www.zjhuiwan.cn/images/images/yx_thumb.gif)
![[怒骂]](https://www.zjhuiwan.cn/images/images/nm_thumb.gif)
![[心]](https://www.zjhuiwan.cn/images/images/hearta_thumb.gif)
![[伤心]](https://www.zjhuiwan.cn/images/images/unheart.gif)
![[猪头]](https://www.zjhuiwan.cn/images/images/pig.gif)
![[好的]](https://www.zjhuiwan.cn/images/images/ok_thumb.gif)
![[耶]](https://www.zjhuiwan.cn/images/images/ye_thumb.gif)
![[厉害]](https://www.zjhuiwan.cn/images/images/good_thumb.gif)
![[不要]](https://www.zjhuiwan.cn/images/images/no_thumb.gif)
![[赞]](https://www.zjhuiwan.cn/images/images/z2_thumb.gif)
![[来]](https://www.zjhuiwan.cn/images/images/come_thumb.gif)
![[弱]](https://www.zjhuiwan.cn/images/images/sad_thumb.gif)
![[蜡烛]](https://www.zjhuiwan.cn/images/images/lazu_thumb.gif)
![[钟]](https://www.zjhuiwan.cn/images/images/clock_thumb.gif)
![[蛋糕]](https://www.zjhuiwan.cn/images/images/cake.gif)
![[话筒]](https://www.zjhuiwan.cn/images/images/m_thumb.gif)
![[围脖]](https://www.zjhuiwan.cn/images/images/weijin_thumb.gif)
![[转发]](https://www.zjhuiwan.cn/images/images/lxhzhuanfa_thumb.gif)
![[路过这儿]](https://www.zjhuiwan.cn/images/images/lxhluguo_thumb.gif)
![[变脸]](https://www.zjhuiwan.cn/images/images/bofubianlian_thumb.gif)
![[困]](https://www.zjhuiwan.cn/images/images/gbzkun_thumb.gif)
![[生闷气]](https://www.zjhuiwan.cn/images/images/boboshengmenqi_thumb.gif)
![[不要啊]](https://www.zjhuiwan.cn/images/images/chn_buyaoya_thumb.gif)
![[泪奔]](https://www.zjhuiwan.cn/images/images/daxiongleibenxiong_thumb.gif)
![[有钱]](https://www.zjhuiwan.cn/images/images/youqian_thumb.gif)